Thursday, 3 March 2016

Tanki Online- 3 Isida Tricks every Pro should know

Tanki Online has a lot of players that use Isida, most of which are noobs. Think you are a pro? Then you should definitely know these three tricks:

1. Healing teammates from concealed positions

There are a lot of Isidas that heal their teammates, but that's about it. Defense is an art. A top score looks nice on screen but your 0.10 D/L doesn't. A pro Isida does not just give away their life, they heal their teammates and get into smart positions to protect themselves. That means hiding behind structures while healing, all kinds of structures- walls, pillars, houses, fences, pretty much anything and everything, even other tanks.


2. Microupgraded Isidas have crazy ranges

Yes, with a fully MU'd M3 Isida (technically an M4), you can make life miserable for the opponents. You can deal damage and heal your teammates from significant distances increasing your battle (area) compass.


3. Being flexible

This is especially true for newbies just trying out Isida- don't just stick with defense or offense. Your turret, Isida, is a great tool: it can heal teammates, it can deal damage to the enemies and it can also restore energy while dealing damage. As appropriate, use it for attack, defense and capturing flags. In short: you have many tools in your kit, use each one wisely.

Tuesday, 1 March 2016

How to remove captions in Movie Maker

By default, Movie Maker adds photo and video captions when placed on the timeline. However, it is possible to change this setting.

Step 1: Open Movie Maker.

Step 2: Go to the File Menu and select About Movie Maker.


Step 3: From the left menu, click on Captions.


Step 4: Uncheck the box associated with Automatically add the caption when I add a photo or video that has one.


Step 5: Click on OK.

Below is the video tutorial:

Monday, 29 February 2016

How to delete a Blogger blog

Planning to delete your blog? Easy-peasy!

Step 1: Login to your Blogger account and select the blog you want to delete.

Step 2: From the left menu, select Settings.


Step 3: From the drop-down options, select Other.


Step 4: Under the Delete Blog section, click on Delete Blog.


Bonus step: Blogger will offer you the facility to download your blog. If you choose to do so, click on the Download Blog button. This will save the blog to your computer as an XML file which can be re-uploaded if you choose to host the content again.

Step 5: Click on Delete This Blog to finalize the deletion.


How to link a blog page to an external web address with Blogger

Do you want to create a page that redirects users to an external web address? Blogger's page functionality allows you to do this.

Step 1: Login to Blogger and select the blog you want to make changes to.

Step 2: From the left menu, select Layout.


Step 3: Click on the Edit link associated with Pages.


Step 4: Click on + Add external link.


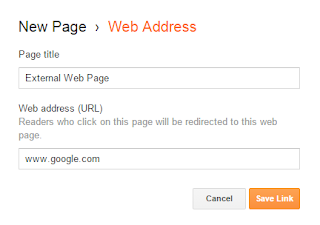
Step 5: In the first text box, enter the title of the page. In the second text box, enter the site address you want the page to redirect to. Then click on Save Link.


Step 6: Click on Save. This will save the changes made to Pages.

Step 7: Click on the Save Arrangement button (on the top right of your Layout screen) to update your blog with the new changes.


Sunday, 28 February 2016

How to change your blog address on Blogger

Changing your blog address with Blogger is extremely easy. Just follow the steps below:

Step 1: Login to Blogger and select the blog you want to makes changes to.

Step 2: From the left menu, go to Settings.


Step 3: Click on the Edit link associated with Blog Address under the Publishing section.


Step 4: Enter your new blog address and click Save.

How to remove labels, comments, author name, location, time from Blogger posts

Sometimes having too many details may make your blog post look messy. Perhaps you only want some of these details to be visible, or none at all. To remove labels, comments, author name, location and time from your Blogger posts, follow the steps hereunder:

Step 1: Login to your Blogger account and select the blog you want to make changes to.

Step 2: From the left menu, select Layout.


Step 3: Click on the Edit link associated with Blog posts.


Step 4: Uncheck whatever components you do not require to be shown on your blog posts.


Step 5: Click on Save.

Saturday, 27 February 2016

How to add Blogger posts to pages

You may be wondering if you could have your blogger posts show on pages other than the home page. Perhaps, you want to segregate your posts into various categories. This can be achieved easily using Blogger's labels function.

Step 1: Add labels to your posts.

For this step, you first need to open your post in Blogger's text editor. You will notice the Labels tool under Post Settings. Click on Labels and your label in the text box.


If you are adding multiple labels to your post, separate them using commas. Once you have added the label(s), click on Done and publish your post.

Step 2: Identify your label link.

There are two ways of identifying the URL of your label. One way is to click on the label link on your published blog post and copy the URL. The other way is to copy the following URL:

 http://yourblogname.blogspot.com/search/label/yourlabelname  

Replace 'http://yourblogname.blogspot.com' with the URL of your blog and replace 'yourlabelname' with the name of your label.

Step 3: Publish your new page!

Now that you have the link to your label, head over to the Layout section. Click on the Edit link associated with your Pages gadget.


Next, click on Add External Link. In the first text box, write down the name of your page.


In the second text box, paste the URL that was generated from the label. Then click on Save Link.


Once you are done adding all your page links, click on Save.


Save your layout arrangement and view your published site!

Friday, 19 June 2015

Tanki Online- The Ultimate Guide to collecting Gold Boxes (become a gold hunter!)

Are you not collecting enough gold boxes? Fret not. We have created a step by step guide just to help you.


Gold boxes usually hold a value of 1000 crystals. On special occasions, we have seen the value rise as high as 9000 crystals! 1000 crystals is a significant addition of crystals to your crystal stock. It is a very effective way to earn crystals in a very short amount of time. Usually, accumulating 1000 crystals could take between 20 to 180 minutes of your time depending on your rank! However, the gold boxes don't fall often, and when they do, there's usually many tanks fighting for it. Here's a step by step guide to help you get the gold box:

Step 1: Be Prepared

Depending on what map you're entering, customize your tank to improve your chances of grabbing the gold box. For example: You do not want  to be using mammoth in a large map (unless you're a sniper, make sure you get your priorities right).

Heavy tanks could be used in small maps where close and medium range combat is the general style of battle, such as in Arena or Island. In larger maps, given that your aim is to get the gold box, you should make use of lighter hulls such as wasp or hornet. These will allow you to search for the active gold box drop zone and help you reach the gold box when it drops. Light hulls are essential for mobility on the battlefield.


Step 2: Wait for 'it'...Wait for the gold box!

There are no fixed intervals when the gold box drops. However, when it does, a message appears at the top of the screen that reads "Gold box will be dropped soon". 


It is hard to miss this message, since it comes with a background sound specific to the gold box. In case you haven't heard it, you can listen to the gold box drop sound in the video below.


3. Drug

The first thing to do when you hear the gold box drop sound is to drug! If you're in a small map and/or using a light turret, it'd be a good idea to use Double Armor which can keep you in one piece. Conversely, it'd be a good idea to use Speed Boost if you're in a larger map and/or using a heavier hull (dictator, mammoth).

If additional supplies are available in your immediate surroundings, grab them before somebody else does!

Tip: If you're low on health, consider self destructing first and then employing drugs.


Step 4: Get searching!

Post sound notification, you will have 30 seconds before the gold box actually falls. Your first goal in this limited period of time is to locate the active gold box drop zone. This indicates the location where the gold box will drop. Usually, it's easy to find the drop zone in smaller maps such as Arena, Hill, Sandbox etc.


Tip: Sometimes when you are unable to locate the drop zone, you could go to the center of the map and see where the gold box is dropping. As soon as you see it, charge!

Extra Step: If you manage to find the drop zone and still have time on your hands, assess the drop zone environment. You need to consider:

1. The number of tanks close to the drop zone. (Use this to: 1. Mentally prepare an approach to combat the enemy tanks when closing in on the gold box. 2. Estimate the time you will wait while the gold box is still "dropping")

2. Physical environment. Is the gold box going to drop near a high rise surface or wall? You can make use of tactics to increase your chances of getting the gold box. 

If there is taller land/physical structure close to drop zone, go there. This way you may grab the gold box in the air by jumping instead of waiting for it on the lower surface.

If the drop zone is at a wall, you could charge in fast and stick to the wall. No matter how much tanks push you, you won't be going through that wall.

In crowded games with large maps, it would be a good idea to try and get onto other tanks that would be fighting for the gold boxes. This increases your chances of getting the gold box dramatically.

Step 5: Action

You've prepared. You see the gold box dropping. It's time to put your plan into action!


Tip: If there are a lot of players closing in the gold box, try to get on top of one of the tanks so that you can hover yourself to the gold box. (This can be done by firing another tank in the closest possible range with a turret like railgun.)

More tips
  • Make sure to stock up on supplies
  • If you see a gold box dropping far away, do not lose hope. NEVER give up. Charge ahead. You never know what will happen. Many a time I've seen enemy tanks completely destroy each other leaving the gold box stranded.
  • If you haven't yet caught any gold boxes, I'd recommend making first attempts in the maps Arena, Hill, Ping-Pong or Sandbox.
Gold hunting is a skill that you develop over time. If you play everyday with the aim to catch gold boxes and make use of the guide above, you can become skilled at this practice in an extremely short period of time (1 to 3 weeks).